An FTP client is sometimes needed to upload files, make configuration edits or fix errors in your WordPress installation.
FileZilla is a free, fast and easy to use FTP client that can securely connect to your WordPress website.
This post will show you how to download and set up the Filezilla FTP client to connect to your WordPress installation.
How to Download and Install FileZilla for Free
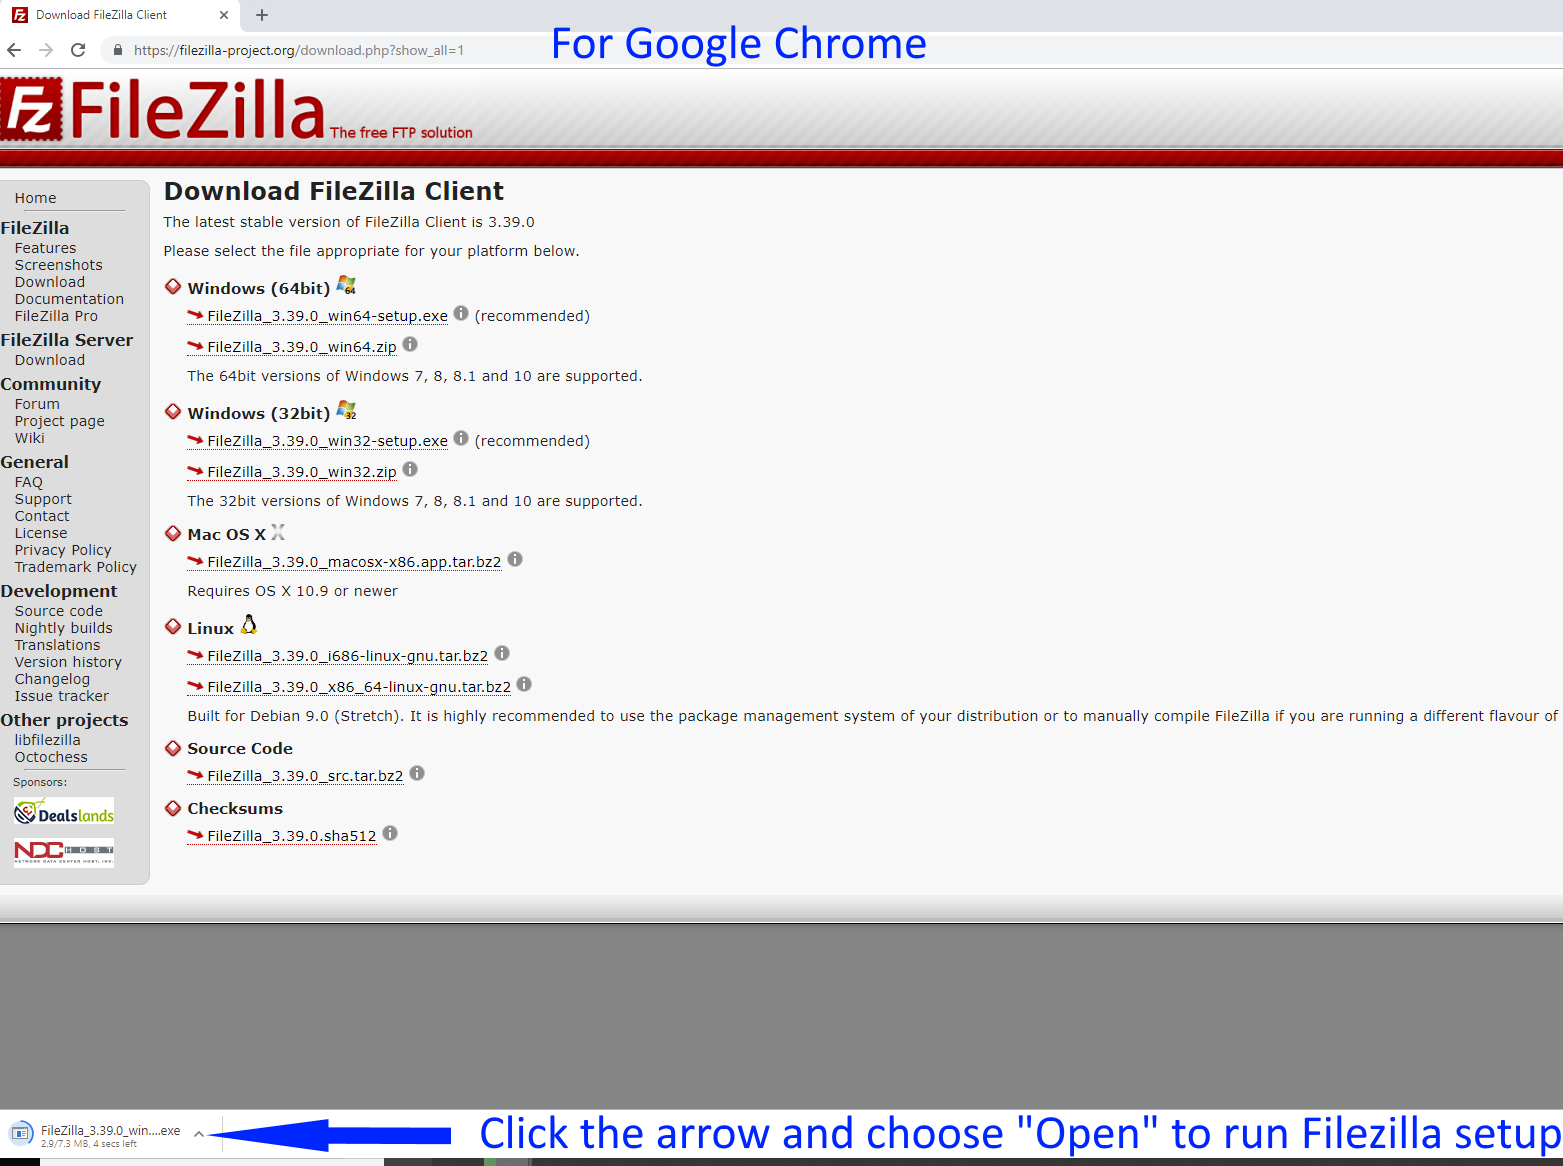
You can and should only download FileZilla directly from the author’s website at https://filezilla-project.org.
Here is the direct link to the FileZilla client download page for all operating systems: https://filezilla-project.org/download.php?show_all=1
Installing FileZilla for Windows
For Windows, choose the win-64bit-setup.exe version unless your computer is ancient then you might need the 32 bit version.
Once the download is complete, go to your web browsers download section and run or open the Filezilla install file to setup Filezilla on your computer. The file may also be located in your Windows Downloads directory. You can double click on it there to run the FileZilla setup.
Accept the license terms. WARNING, if the FileZilla installer offers optional toolbars, security clients or other companion software, be sure to choose NO to those options.
FileZilla is now installed on your Windows computer.
Installing FileZilla for Mac
FileZilla for Mac requires OS X 10.9 or newer.
Click on the MacOSX app.tar.bz2 file to download Filezilla to your Mac. Once downloaded double click on the file, accept the terms of service and install.
Running FileZilla for the First Time
Now that FileZilla is installed on your computer, run the program. If you are having trouble locating the program in Windows, you can always press the Windows key on your keyboard begin typing the first few letters of the program name you are searching for.
For example, press the Windows key:

and start typing, “filez….” and you should see the program icon appear, click on it to start FileZilla.
Connecting to WordPress via FTP
Difference between FTP and SFTP
While FTP and SFTP can both be used to upload and download files directly from a server, they are different protocols. FTP is a very old protocol that has poor security, no encryption and is not used as often. Today, when most people say connect by FTP they actually mean use the more secure SFTP – SSH File Transfer Protocol.
The following tutorial assumes you are going to use the SFTP protocol only.
Setting the Connection Information
For this step, you will need the SFTP username and password for your server. This information needs to be provided by your web host and may be located in your account details or control panel at your web host. Your SFTP username and password are not the same as your WordPress login details or the login for your web host account.
If your hosting provider uses a cpanel, the sftp username and password may be the same as your cpanel username and password. If you are having trouble obtaining your SFTP connection information ask the technical support for your hosting provider.
Enter your website site information as shown in the screenshot below.

After entering your site information press the Quick Connect Button.
If FileZilla fails to connect to your WordPress site consider the following:
- Your web host provider may use a different domain for SFTP than your WordPress domain name. Check with the tech support for your web host provider.
- Your web host may use a different port than port 22 for SFTP connections. Check the help documentation for your web host.
- Your web host may have SFTP access turned off by default and you may need to request SFTP access form your web host provider.
- If you are using a reverse proxy CDN like Cloudflare or Incapsula, you will need to instead put the IP address for the web server assigned by your host to your site. (That is a different IP address than the one returned when you do a DNS lookup of your WordPress domain which will only show the IP of the reverse proxy like Cloudflare.)
- Check that you are using the SFTP password provided by your hosting provider, it will not be the same as your WordPress login details.
- When you communicate with your hosting provider to troubleshoot access issues, be sure to specify you are trying to establish an SFTP connection with FileZilla. They will be familiar with FileZilla and can provide more specific advice for their systems.
Once you have successfully established a connection you should see your local computer files in the right pane of FileZilla and your WordPress installation files in the left pane. See the screenshot below.

Navigating to the Root Directory of Your WordPress Installation.
Now you need to make sure you are in the right place before you begin editing files like .htaccess or your wp-config.php etc..
If you see the wp-config.php and other wp-XXXX.php files then you are in the right place! If not, is there a directory “public”, or “public_html” or similar? Click to enter that directory, now do you see the wp-config.php file?
If you are unable to locate your WordPress installation directory, check where your web host provided the SFTP username and password, a special directory may also be specified or consult their technical support.
You are now ready to download, upload or edit files in your WordPress installation.
You can find themes files at “/wp-content/themes/
Plugins are located at “/wp-content/plugins/”
Images and other media uploaded to your site through your Dashboard is located at /wp-content/uploads/ and then organized by four-digit years ex. 2019 and months “01” to “12”
BE CAREFUL and always make a backup!
Do not make changes in the wp-includes or wp-admin directories. Not only will you likely break your WordPress install but changes in those directories are often overwritten when your site updates to a newer version of WordPress.