It is easy to start your own blog when you follow this step by step tutorial. This how-to walks you through the initial setup of your own blog all the way to writing your first post and sharing it to social media. Unlike other guides, this tutorial shows you all the steps you need to start a successful blog and was written by a successful blogger, Kristine of Kristine’s Kitchen Blog. You can read Kristine’s thoughts on starting a blog here and how she quit her job teaching to become a full-time blogger.
To get your blog up and running, you need web hosting and blogging software which you can easily set up with Steps 1 to 3 below in about 15 minutes. We will be using the free WordPress blogging software which powers more than 30% of all websites on the Internet.
The Steps to Starting a Successful WordPress Blog
Table of Contents
- Hosting and Choosing a Domain Name for Your Blog
- Getting WordPress Installed at Your Web Host
- Logging In to WordPress for the First Time
- How to Choose and Activate a WordPress Theme
- How to Install Helpful WordPress Plugins
- Protecting Your Blog from Comment Spam
- Optimizing WordPress for Search Engines
- Blog Post Writing Tips and Tricks
- Growing Your WordPress Traffic with Social Media
Signing Up for Web Hosting
The easy steps below require no technical knowledge and show you exactly how to get your self-hosted blog started and how to choose a great name for your blog.
We will be using Siteground for hosting your blog. Siteground hosting is one of the three web hosts recommended by the creators of the WordPress blogging software.
To start the set up of your new blog click this link. Choose the least expensive StartUp plan for $3.95 per month. (Don’t worry you won’t be charged until you complete the process.)
Click Here to Get started with With Your New Blog and to Reserve Your Blog’s Website Address
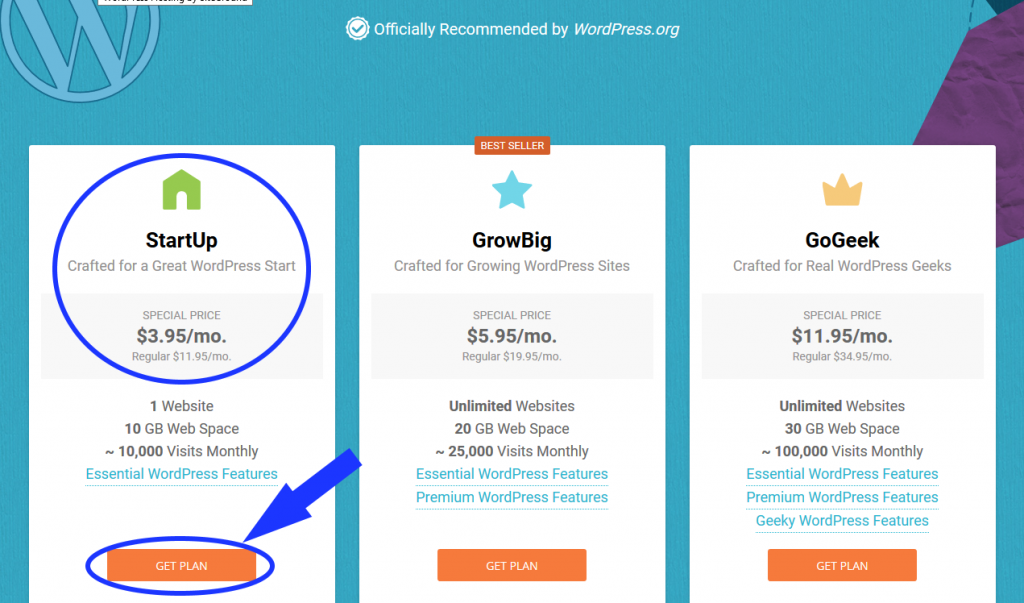
The first thing you will be asked to do is to choose a domain name for your blog, ex. https:\\your-blog-name.com (Note: Domain names cannot be changed at any web host once purchased unless you pay another domain name registration fee, about $16.00. See the next section for tips on choosing the right domain name. )
Choosing the Best Domain Name

Why a Domain Name Is Important
- A domain name is a visitor’s “first impression” of your site. Your domain name or URL is shown in the address bar, think google.com or instagram.com. To choose a good domain name, use words that describe you, your blog or product. A good domain name can make a positive and lasting impression.
- A domain name can affect SEO. While Google no longer considers whether the words in your domain name match the topic area (called “exact match domains”), users are still more likely to click on domain names that include words that describe the topic your blog or business is about. Therefore, using descriptive keywords in your domain can still help your search engine ranking.
- A domain name defines who you are and your brand. A catchy domain name can stand apart in a crowded niche. If you plan to create a business, keep in mind that generic words usually cannot be trademarked. Try to think of something unique and descriptive.
How to Choose the Right Domain Name When Starting a Blog
- .Com is the preferred domain suffix
- Try to make it easy to type and pronounce
- Avoid hyphens, numbers or Symbols
- Case does not matter for Domain Names
- Avoid a Mouthful of Words
Bonus Tip:
Check if social media names are already taken for your chosen domain name or brand.
After choosing your domain name, enter your payment information to complete your web hosting purchase. Choose 1 year or more of hosting to get the best deal.

Write your account password down in a safe place. Proceed to the next step to get started with the WordPress blogging platform and easy setup wizard. If you aren’t logged in at Siteground for some reason or previously stopped at this step, use the email and password you entered on the payment screen to log back into your account.
Installing WordPress
You can begin the setup of your new blog by navigating to the My Accounts tab and clicking on the “Launch Setup Wizard” button. If you aren’t logged in, use the email and password you entered at the payment screen to login first.

After launching the setup wizard it is time to install WordPress and choose a username and password. This password should be different than your account password.
Select the WordPress icon to install WordPress. See below.
The username you choose will show as the author of your posts in WordPress. Your first name, part of the name of your blog, or other pen name are all good choices. While you cannot change your username you can set a nickname later that will show as the post author instead of your username.
Choose a strong password. Like any Internet login, hackers, spammers and other bad actors will try to log in to your WordPress site. Choose a password with 8 or more characters and a mix of letters, numbers and symbols. Write your password down in safe place or use a password manager.

Click the Confirm Button, once you have filled out all of the setup fields.
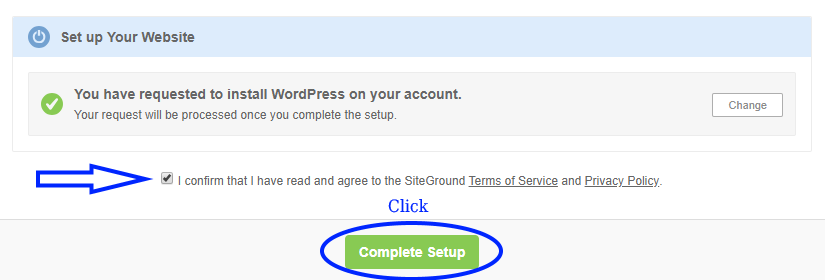
WordPress is now installed and ready for you to login!
Logging In To WordPress for the First Time
To login to your WordPress dashboard, open a new window in your web browser and type your domain name plus “/wp-admin”, like below:
Example:
If your domain name is: yourdomain.com
Enter: yourdomain.com/wp-admin in your web browser to go to the WordPress login page.
Replace yourdomain.com name with the name you chose in Step 1.
(Do not forget to change the .com to match your choice if you purchased another type of domain like .net, .info, .co etc…)
At the login screen enter the username and password you chose in Step 2.

If your login fails, check the username and the password you wrote down from Step 2 and try again. Once you have logged in you are ready for Step 3.
If you are having trouble with your WordPress installation, open a support request with Siteground. Go to the Support Tab, scroll to the bottom of the page and click for a new support request.

Below are support links for some common WordPress hosts:
How to Choose and Activate a New WordPress Theme
Good news! A default WordPress theme is already installed on your site. If you want to start blogging without worrying about your theme right now, login to your site and skip to Step 8, Blog Post Writing Tips and Tricks.
If you want to learn how to customize your blog, its theme and plugins, please continue this tutorial.
While choosing a WordPress theme can seem overwhelming, it shouldn’t be because it is easy to change themes! It is also common to change themes multiple times if you are just starting your site.
Where can you find new WordPress themes? The WordPress.org directory contains many free themes that are great for beginners. You can install these themes right from the Dashboard of your site. There are also many excellent paid themes under $100.00 from creators like Studio Press, Elegant Themes, Graph Paper Press and many more. I recommend you finish setting up your blog and get some content written before you purchase a paid theme.
Before you start changing your theme, consider the type of blog you intend to create. Will your blog be focused on writing or photography? Do you have products to sell? You want to select a theme that has the features you will need to make the most of your content.

Your WordPress Dashboard should look similar to the screenshot above. Your web host may have customized your Dashboard with some extra options or menu items and the center area may have different widgets.
To install a new theme from the WordPress Dashboard, choose the “Appearance” menu item and then “Themes.” The Themes page will load showing your currently active theme and any other installed themes. To add a new theme click on the “Add New” button.

From here you can browse the available themes. You will be viewing the themes in the Featured category to start which has many good choices. Click on Popular or Latest to see many more themes. You can use the “Feature Filter” option to narrow down the list.
You can hover over a theme that looks interesting and choose Live Preview or click Install to install it. You can easily switch back to your prior theme by going to the menu item for Appearance —> Themes again and finding your old theme and choosing the Activate button.
The preview of each theme utilizes sample posts and images. If you haven’t written any posts yet or uploaded any images, your site may not look much like the theme image until you add some more content. Building your blog takes time and content. Some themes let you customize colors, widgets and other content under the Appearance Menu in your WordPress Dashboard.
I highly recommend you write some content with images and think about your topic areas and subtopics before you spend too much time worrying about your theme. Eventually many bloggers migrate to a paid theme from a designer with a custom logo.
If setup and customization of WordPress is overwhelming and you want to get to writing your first post, skip to our Instructions and Tips on How to Write a Good Blog Post. If you are skipping to writing your first post, please do return to the following step on installing plugins at later time because it is important.
Best WordPress Plugins for New Blogs
What is a WordPress Plugin? A plugin is a piece of code or software that extends the functionality and features of your WordPress website. There are thousands of free and premium WordPress plugins available to choose from.
In this section we are going to cover how to find new WordPress plugins, how to select a WordPress plugin, how to install a WordPress plugin and which WordPress plugins you should use with a new blog.
How do you find new WordPress Plugins?
Most WordPress plugins are available from the official WordPress.org repository. You can download and install plugins from the official repository right from your site Dashboard. I strongly urge you not to download plugins from another source unless you are purchasing the premium version of a plugin directly from that plugin author’s site.
Plugins from unofficial sources may contain malicious computer code that could compromise your site and the computers of your visitors.
It is easy to find and install new WordPress plugins. Just navigate to the “Plugins” menu item in your WordPress Dashboard. The first screen will display the currently installed plugins. You will see an “Add New” button at top of the page, click it.

The Add Plugins page is where you search for and install new WordPress plugins. The first couple of plugins shown by default are featured plugins created by the authors of WordPress. You will see there is also a Popular, Recommended and Favorites tab. There is also a search box where you can type in what type of plugin you are looking for.
How do I select the best WordPress Plugin?
- Choose plugins that are compatible with the current version of WordPress.
- Consider the star rating other users have given the plugin.
- Prefer popular plugins that show many active installations, 10,000+ installations or more.
- Check the support forum to see if the author is active or offers an external support option.
When you find a plugin that looks interesting click on the “more details” link and see below.

The plugin details screen will show you a lot more information about the plugin.

How to Install a New WordPress Plugin
Installing a WordPress Plugin is as easy as finding the plugin in the Add New plugin screen of your Dashboard and clicking the Install Now button as shown in the screenshot above.
Which WordPress Plugins Should You Install on a New Blog?
There are a few plugins that I recommend everyone install. All of the plugins below are free and add important features and functionality to WordPress that every blog should have.
There are competitors to all of the recommended plugins below which are also great choices. However, the recommended ones provide the best mix of ease of installation, use and functionality for a new blog based on my years of testing and support of other blogs.
SEO Plugin
An SEO plugin optimizes your site for search engines like Google by configuring and prompting you to complete the hidden metadata that search engines use to learn about, index and rank your site.
SEO Plugin recommendation: All in One SEO
Caching Plugin
A caching plugin periodically makes a copy of your site that is served to visitors without running all the programming code behind WordPress. This static page loads a lot faster for your visitors and your server will be able to handle many more visitors at a time when using a caching plugin.
Caching Plugin recommendation: WP Fastest Cache
Image Optimization Plugin
An image optimization plugin ensures that your images are properly compressed for quick loading on all devices including mobile phones with slower connections. Without an image optimization plugin, visitors will be frustrated by slow images and may leave your site without visiting other pages. A slow site will also not rank as well in Google search results.
Image Optimization Plugin Recommendation: Jetpack by the makers of WordPress
CDN Plugin
A CDN (or content delivery network) plugin offloads common files such as images and other theme design files to specialized speedy servers located around the world. A CDN makes your site faster and able to support more visitors by loading images and other statics files from a closer location to each visitor. A CDN also reduces the load on the servers at your web host.
CDN Plugin Recommendation: Jetpack by the makers of WordPress
You can install each of these plugins by navigating to the “Plugins” Menu item. Click the “Add New” button and then search by name for each of the plugins in the keyword box as shown above. Go ahead and do that, leaving the Jetpack plugin for last.
All done? Have any problems? Leave a comment and I will try to answer them all.
Now let’s finish setting up the Jetpack plugin.
When installing the Jetpack Plugin you need to make an account with WordPress.com. This account can also be used to enable the Akismet Anti-spam plugin installed by default to your site. Choose the Free Jetpack plan.

Once you have installed the Jetpack plugin you will need to turn on the image optimization and CDN. Find the new Jetpack menu item on your Dashboard sidebar. Click the Jetpack menu item once and then choose to activate the recommended features on the initial setup screen.
To verify that the image optimization settings are enabled, click on the Jetpack menu item again and choose “Settings” as shown in the screenshot below. Scroll down to Performance & Speed and enable the optimization toggles.


Protecting Your WordPress Site From Comment Spam
All WordPress blogs are the target of comment spam. Bots and other undesirables leave comments because the WordPress software also allows them to leave a link back to their product, service or malicious site.
The first line of defense against comment spam is to discourage spam comments by making sure you are properly moderating comments. Comment moderation settings are located in the the Settings menu item and inside the Discussion sub-item.

To prevent comment spam, I recommend you moderate every comment by checking the options shown below. You can also disable comments entirely as shown if you do not want visitors to comment. Set the notification options however you like. I get too many emails as it is so I turn off email notification of new comments.
While it sounds like a good idea to require users to register and login to post a comment, in my experience it reduces the number of real comments from your visitors.
See the common comment moderation options in the screenshot below.
Next we will enable the Akismet anti-spam plugin.

Setting Up Akismet Anti-Spam for WordPress
Now that you set the options to moderate comments, you should also activate the anti-spam plugin provided by the creators or WordPress. Navigate to your plugins page by selecting “Plugins” on your Dashboard.
Activate the Akismet plugin as shown below.

Continue with setting up the Akismet plugin.

You will be prompted to pay but you can use Akismet for free with a few extra steps as shown below. Choose Connect with Jetpack since we made a Jetpack account earlier.

Next, select the personal plan.

Now, move the payment slider to $0/year and enter in the required information.

If a popup appears asking you to confirm or activate, do it.
You are done and now protected from the worst spam comments.
Optimizing WordPress for Search Engines
SEO or search engine optimization can be an intimidating and technical topic. I am going to simplify SEO for you with a few basic steps you can take with your new blog.
You are probably a little overwhelmed already if you completed the tutorial to this point in a single sitting. You can always bookmark this page and use the table of contents at the top to return to where you left off.
So, what is SEO? SEO is the process of implementing and following best practices to encourage the indexing and appearance of your site in search results. Think Google.
Why is SEO important? Traffic for most blogs comes from two places, search engines like Google and social networks. If you ignore SEO you are ignoring a primary way visitors can discover your content and site. Moreover, since a majority of bloggers that have been blogging for any period of time have learned about SEO, you need some SEO knowledge to be competitive.
Here is the secret, basic SEO for your blog is easy. To get started all you have to do is implement the recommendations below and in the next section of this guide on blog post writing tips and tricks.
First we will check the settings for search engine visibility and WordPress permalink structure.
On your Dashboard navigate to “Settings” —> “Reading”. Check that the box to stop search engines is NOT checked as shown below.

Now, let’s make sure your permalink structure is set to Post Names only. Displaying the date in your URL is unnecessary and might turn away visitors. Only use the date in your permalink structure if your content is very time sensitive.
Under the Settings menu, click on “Permalinks” and choose the “Post Name” radio button which will make your posts appear similar to: http://your-domain-name.com/name-of-your-post/

Installing an SEO Plugin
You should have already done this above and installed All In One SEO as a recommended plugin. If you didn’t install the plugins, please go back to that step before returning to this point in the guide.
If you would rather install Yoast SEO instead of All In One SEO, go ahead and do that; they are both great plugins. Do NOT install both SEO plugins at the same time as they will conflict with each other.
Configuring All In One SEO or Yoast SEO Plugin
Great news! The All In One SEO plugin and the Yoast SEO plugin are already configured with common sense default settings.
Ready for More SEO Tips and Tricks?
If you want more in depth information on SEO look for our future post WordPress SEO, A to Z.
It is now time to start working on some content for your site. In the next section we will cover the process of writing a post and SEO considerations.
Blog Post Writing Tips & Tricks
Writing a WordPress post can be broken down into three steps: brainstorming, writing and optimizing.
Brainstorming Before Writing a Post
Ultimately, blogging is about sharing the passion and knowledge you have with the world. You cannot do that effectively with a jumbled mess of ideas. Readers appreciate effective communication and so does Google.
A post with logical headings and clear organization will keep readers on your site longer, earn visits to related pages and decrease visitor bounce rate back to Google.
An increased dwell time and lower bounce rate are correlated with the most successful sites. Those factors as well as the length of a post are significant factors in ranking on the first page of Google search results. These same factors will also lead to better advertising rates when you begin to monetize your blog.
So, start with the practice now of a little brainstorming and organization before you jump into writing your posts.
Try to organize your ideas around a central topic. Then break the topic into smaller ideas and those will be your H2 to H4 headings. Consider the items of information or content that will be under each subtopic.
Use Google to research your topic. Who is ranking in the top 10 for your topic and how long is their content? Aim to make your content as long as the top ranking posts on Google.
Typically top ranking posts are more than 1000 words for a competitive topic. If the top ranks are dominated by large well known domains your content is going to need to be more comprehensive than their pages to rank.
While researching your competitors through Google, consider the terms and keywords used by others in their titles and what Google suggests in the “People also ask” box.
If your topic has multiple variations consider using the more popular one. For example, you might have a recipe that makes great chicken for tacos so you think to title and refer to it as a “Great Taco Chicken Recipe.” However, if you search Google for “taco chicken,” you will see all of the results are instead variations on “chicken tacos” (not “taco chicken”) . Why? “Taco chicken” is not a commonly used term and is not commonly searched for.
However, “chicken tacos” is commonly searched for by thousands of people each month. You want to phrase your post titles and headings and describe your post topic with the common every usage that your readers use when they search for more information on Google. We call this a keyword. So, remember to use Google to check how a term or phrase is commonly used and use the more common keywords in your post.
Once you have completed the brainstorming process, organized your thoughts, and done a little research on Google, it is time to write your post.
How to Write a New Blog Post
Navigate to Posts –> Add New in your WordPress Dashboard to begin a new post.
Enter your Title as shown in the example below. Since the title in Google search results start to be cut off after about 65 characters, make sure the first couple of words in your title draw your readers in.

As of WordPress 5.0 and later, a new editor named Gutenberg is the default editor for all posts. Gutenberg is modular: each heading, paragraph and image are referred to as blocks. Plugins and themes can further extend the editor adding new custom blocks.
To add a block click the plus symbol as shown below.
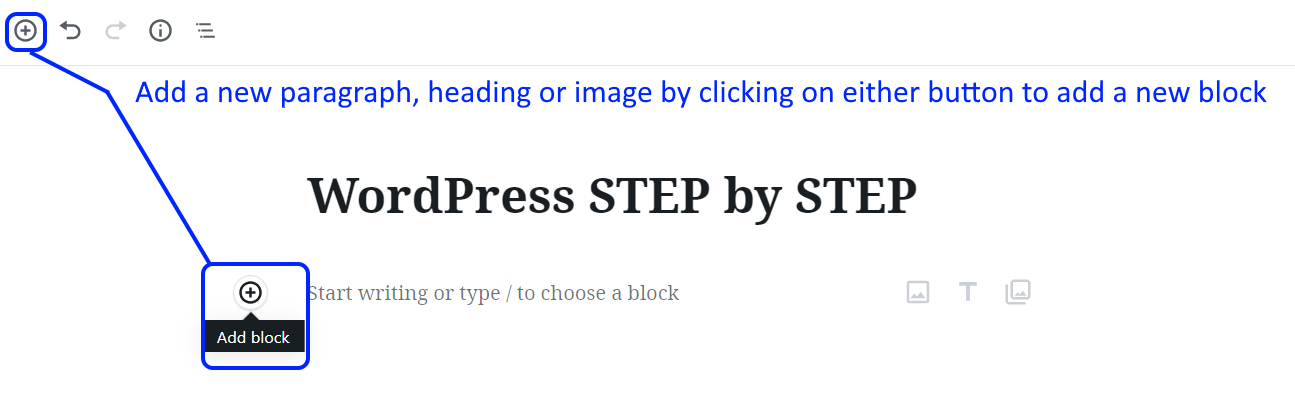
Next, select the type of block you want to add, a new paragraph of text, an image, a new heading, etc…

Continue adding new blocks in the post editor until you complete your post.
The Importance of Editing Your Posts
Once you have a draft of your post, edit, edit, edit. Poor spelling and awkward phrasing drives visitors away. I make a lot of mistakes when writing and it takes time to edit my posts. I still find mistakes later and you probably will too. It is a work in progress, but do carefully edit your posts. Correct any mistakes you find before publishing your posts.
Tips for Writing and Optimizing Your WordPress Posts:
DO:
- Write a compelling title.
- Use sub-headings H2-H4 to break up your content by subtopic.
- Use the List block when applicable.
- Use short paragraphs.
- Edit your post, check your spelling and grammar.
- Avoid long complex phrases and run on sentences.
- Use images to break up long blocks of text.
- Link to other blogs or websites that are relevant to your post.
- Write 500 or more words per post.
DO NOT:
- Do not verbatim copy content for another website. (Google is unlikely to rank your content when it is a duplicate and this also violates copyright laws).
- Do not use copyrighted images. If a complaint is made to your web host your site will be taken offline and you can be legally liable for monetary damages to the owner of the copied images.
- Do not write less than 250 words per post.
When your post is ready, press the publish button and it will appear on front page of your blog. Congratulations, you are a blogger!
Growing Your Blog Traffic with Social Media
Since indexing and ranking of your site by Google takes time, most bloggers want to know how to get more traffic to their blog. The easiest way to get traffic to a new blog is to use social media. If you already have social media accounts such as Facebook, Pinterest, Instagram and Twitter use those account to preview your blog content and then link from your social media accounts back to your blog.
You also need to install a social sharing plugin to your WordPress blog. There are many plugins available. I like to use Ultimate Social Media Icons or AddtoAny. Both are free and can be installed right from your Dashboard as we did above in the step, how to add plugins to WordPress.
Another option is to enable social sharing in Jetpack under Settings and then Sharing. Toggle on the sharing buttons and click “configure your sharing buttons” to set which buttons appear. Choose either Jetpack or one of the plugins above, not both.
If you are creating your own images for your posts you need to be on Pinterest. Highly visual blog topics like food, fashion, art and photography do very well on Pinterest and can send lots of visitors to your blog. To get visitors to your blog from Pinterest you will need to pin your images there.
Make a Pinterest account with the same name as your blog. Organize your Pinterest boards into similar topics as your blog categories. When you publish a new post on your blog, use the pin buttons that will appear as result of the plugins above to pin your images from your new post to your Pinterest account. Search for other bloggers in the same niche on Pinterest and ask to join their group boards to expand the reach of your Pinterest pins.
It is more difficult to drive traffic from Facebook, Instagram and Twitter to your blog. Facebook actively tries to keep users on its site and in the Facebook mobile apps. You can make a Facebook fan page for your blog but it will take a large number of posts and followers of your fan page to drive any kind of traffic to your blog. Your beginning efforts are better focused on Pinterest if your content is highly visual, or if not, your time is better spent creating more quality content.
As your traffic grows, you might be wondering, can I make money from my blog? The answer of course is yes. However, until you have at least hundreds of visitors a day, you should focus your efforts on growing your blog first.
If you found this guide useful, have any questions, feedback, or comments, please leave them below. Thank you.
Disclosure: When you sign up at Siteground with our link we may earn a small commission at no extra cost to you. This allows us to keep this site free from annoying advertising and bring you great content. We only endorse products we have carefully researched, reviewed and tested ourselves.
It is easy to install wordpress using the scripts given by the host. But starting a blog requires you put some effort for new content. Thanks for the steps for blog creation. Will try to find if I can make my blog installation easy.